Last Updated on October 7, 2021
Trying to make a quilted blanket for the first time can be overwhelming. Where do you begin? What style and size of blanket do you want? And how do you put together a quilt?
Answering those questions will only stress you out. This guide is written to help you learn how to quilt a blanket with a sewing machine through a comprehensive process broken down into simple steps.
So, how do you quilt a blanket with a sewing machine? Like with any other project, you first need to prepare the things you need. Gather the tools, decide on a pattern and fabric. While it’s unnecessary to have a design to make a quilt, sometimes it helps to have one to go along with.
Now that you got an idea of how the process will go, read on to start quilting your first-ever blanket with a sewing machine!
Quilting A Blanket On A Sewing Machine
Blankets are precious, and they are considered a must-have item for all households. Having a blanket ready is very important regardless of the climate, season, or weather. For this reason, many are taking an interest in quilting their own blankets.
Quilting is an amusing and sensible manner to skip time. When quilting a blanket, you could be as innovative as you like.
But, that is not the only reason why most sewers love quilting a blanket. They do so because it allows them to make the perfect blanket to give them warmth at night and make an ideal gift for their children, grandchildren, and friends.
Follow the steps below to quilt a blanket with a sewing machine:
Step 1: Prepare The Tools
Here is the complete list of the things you’ll need:
- bias tape maker or ready-made bias tape
- clear nylon thread
- white cotton thread (or a polyester/cotton mix)
- 100% cotton fabric
- long pins
- an iron + ironing board
- batting
- seam ripper
- something to use as a thread trash bin
- walking foot for the machine
Step 2: Select The Fabric And The Batting
Things to think about:
- Consider the colors and scale you use. How many colors do you want to use? How many patterns? Try to get a good mix of designs and colors from the same family.
- Be creative with your fabric options. Look for vintage tablecloths or linens at thrift stores rather than relying solely on fabric options from your local sewing store.
- Your background fabric will be larger than the front of your quilt and batting. Make sure you have enough for a larger size.
Up next is to choose batting. Batting or wadding and filling is the soft material that adds warmth to your project. It’s sandwiched between the back and the front of your quilt.
This material has several fibers, including polyester, cotton, bamboo, cotton blend, and fusible. Vendors sell this in different thicknesses or “loft.” A higher loft is thick, while a small loft is thin.
If you wish to make a large blanket quilt, you should use a higher loft. If you plan on quilting a blanket for kids, you can use a smaller loft. More miniature quilts do not necessitate thick batting unless you wish to have a warmer blanket.
You might also want to know that polyester batting spreads out towards the edges of your quilt compared to other fabrics. Also, fusible batting is known as pucker.
For beginners, I suggest using a cotton blend, cotton, or bamboo batting.
Step 3: Prepare Your Blanket
Cut the pieces
- Before anything else, you should focus on the front quilt. You should cut the small pieces of the fabric individually.
- Place each piece of fabric on the cutting board. Then, place your transparent ruler at the top.
- Utilize your rotary blade and run across the fabric along the exact lines of your mat. Remember the adage “measure twice, cut only once.” It will help you avoid a cutting mistake
Layout your quilt
Now, this is the most fun part – it’s time to design your quilt!
- Place all the fabric pieces and form any pattern you want for your blanket. I suggest doing this on the floor to make things easier since you’ll have plenty of space here compared to the table.
- To not rearrange several times and get annoyed and exhausted, make sure you have your pattern how you want it.
Stack up the rows
- It’s a bit troublesome to have a large quilt pattern placed on your floor. I suggest stacking up the pieces in order.
- Start from left to right across the rows.
- Stack each piece on top of another.
- Mark the top of the row with a post-it note. This technique will help you determine the pattern and avoid confusion.
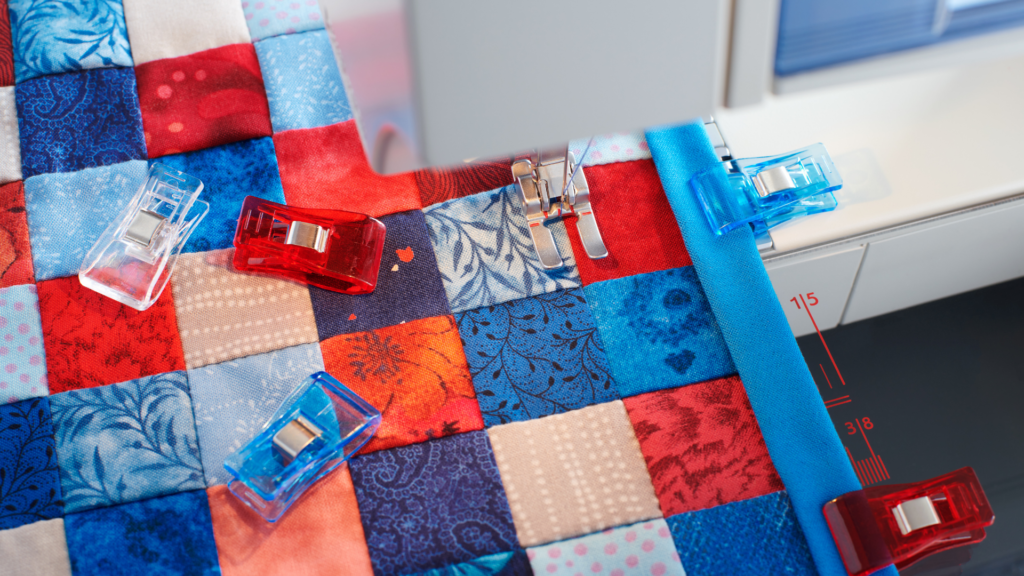
Step 4: Quilt The Fabric
Sew the rows
- Start by sewing each row together. Always start at one end of the row with two of your fabric.
- Lay two squares of the pattern facing each other.
- With your sewing machine’s straight stitch, sew a ¼-inch seam.
- Add the following square in the row to the square before it.
- To sew everything in long, thin strips, work across each row slowly and surely.
Press the rows
- With each piece sewn together, the back will be left with columns of seams that stick up.
- Press these seams flat with your iron to make your final quilt lay flat and look more finished.
- Iron each row in the opposite direction.
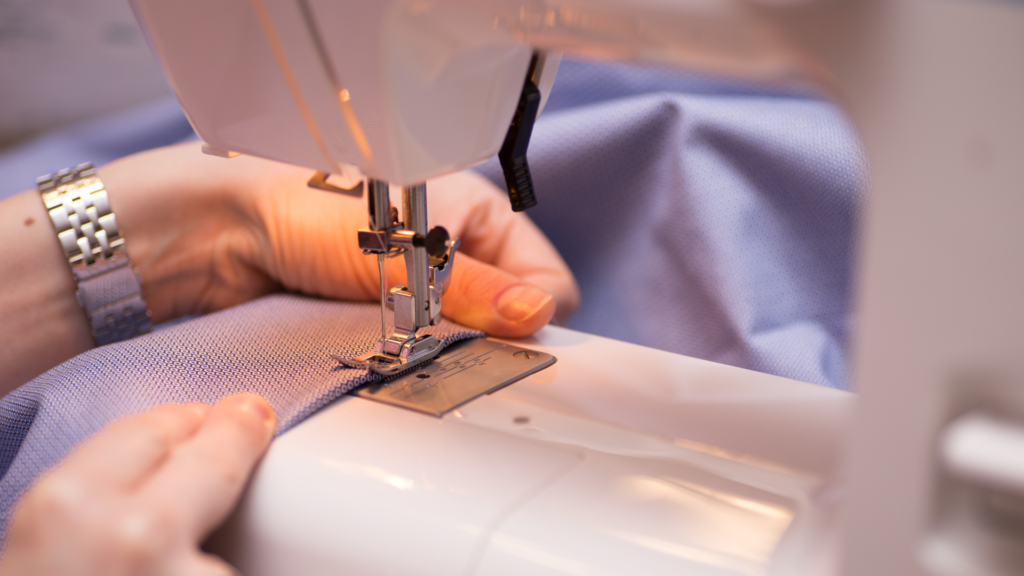
Sew the rows together
- Sew each row of fabric together using the same method you used to sew each little square of cloth together.
- Turn two neighboring rows inwards so that the patterns face each other.
- Sew a 14-inch seam down the bottom.
- Repeat for each subsequent row until you have a finished quilt front.
Press the quilt front
- Flip your quilt front over so that the backside is visible. Iron the entire back of the quilt using the same technique you used to iron each individual row.
- Flatten the seams in opposite directions.
- Sewing the whole thing together will be a lot simpler if you do a good job ironing the fabric.
Step 5: Putting it All Together
Cut the rest of the fabric
- After you’ve finished the top of your quilt, you’ll need to cut the batting and backing. These should be bigger than your quilt front to allow any fabric scrunching throughout the stitching process.
- Both the backing and batting should be 2–3 inches (5.1–7.6 cm) more prominent than the front portion of your quilt.
Baste the quilt
- Basting is the technique of layering and pinning your quilt before stitching. When basting, you have two options: use safety pins to keep the pieces in place or use a spray-on basting glue.
- Place your fabrics out in the order you want them to appear on your quilt: backing pattern side down, batting, quilt front pattern side up.
- Align all of the edges and smooth out any creases.
- Start from the middle and work your way outwards to smooth out the creases.
Sew the layers together
- Begin sewing in the center of your quilt and work your way outwards to force extra fabric and bunching to the edges rather than the center. The most straightforward technique to put the quilt layers together is to “stitch the ditch” or sew within or near the seams you’ve previously made between the sections.
- You may also use your sewing machine to stitch diagonally across parts or free-hand the seams.
Cut the binding
- The binding is a fabric border that goes around the edge of your quilt. It covers the seams and gives them a complete appearance. You have the option of cutting your binding horizontally/vertically or on the bias, with the latter providing greater versatility.
- Cut your strips to be 212 inches wide and long enough to go around the whole perimeter of your quilt (you will most likely have to overlap some).
- Sew the strips together so that you have four sections equal to the lengths of your quilt’s four sides.
Press the binding
- If you have to stitch numerous pieces of cloth together to make a single length for the binding, press the seams flat now.
- The binding should then be folded in half lengthwise and ironed. It will result in a pressed seam running down the center of the binding.
Pin the binding in place
- Place the binding for two opposing sides of your quilt on the top.
- Set up the binding so that the edges match and the patterns face each other. Make use of a lot of pins to keep the cloth in a place like this.
Sew the front of the binding
- Sew a 12-inch seam around the edge of the quilt and the binding. This should be repeated on both sides of the cloth.
- Fold the fabric up and far from the quilt’s center, revealing the printed side of the binding.
Add the remaining binding
- Place the remaining two pieces of binding along the quilt’s open sides. Follow the same steps as the first two sides, sewing the binding down the edge with a 12-inch seam allowance.
- Fold the fabric outwards and far from the quilt’s center, showing the design.
Fold the binding over
- Turn your quilt over so that the back is visible. The binding’s edges should be visible all the way around your quilt. Begin on one side by folding the binding’s edge to match the quilt’s edge.
- Fold the remaining binding over so that it overlaps the back of the quilt. You may iron the binding down to help it stay in place and fasten it with plenty of pins. Repeat on all four sides of your quilt.
Finish the binding
- It’s difficult to sew the binding on the rear since the stitches will show through on the front. As a result, you have two alternatives for minimizing the quantity of visible thread. You can use invisible thread to sew the binding or hand-stitch it using a whipstitch or a ladder stitch. But be careful not to run through all three layers of your quilt.
- Work your way around the quilt’s edges, ensuring that your corners are squared off and your seams are even.
Finish your quilt
Add the binding, and your quilt is done! If you want a softer feel, wash your quilt. Otherwise, your quilt is ready to go. Enjoy!
Tips To Make The Perfect Quilted Blanket
Scrunch, Don’t Roll
A quilt sandwich coiled into a tube is more difficult to work with, mainly if you are free-motion quilting. If you’ve tried rolling your quilt into a tube and it’s not working out, scrunch it instead! Squeeze the extra quilt into the machine’s neck. Through this technique, you can get it out of the way while still being able to flatten the quilt.
Start In The Center
This tip applies to both walking foot quilting and free-motion quilting. Some quilters start quilting in the middle and work their way out, and it allows them to fit half of the quilt through the machine’s throat one at a time.
Instead of scrunching the entire item, rotate it to quilt the opposing side. You can also quilt on the diagonal to get the longest diagonal row of quilting out of the way first, making the remainder of the quilt feel lighter.
Turn The Machine Longways
Are you ready for a mind-blowing tip? Turn the machine so that the needle is closest to you and the body is facing away.
Some quilters find it simpler to press the quilt straight forward into the machine’s neck while they quilt. It is how sit-down midarm quilting machines are set up, and it can help save your shoulders.
Create A Slippery Surface
If you want your quilt’s fabric to merely roll across the table, use a Teflon oven liner or a unique quilting slider. This will give your table a slippery surface for the quilt to glide on. You may tape it to the table and quilt directly over it.
Quilt As You Go
Suppose all of this sounds too daunting. You can always tackle a huge quilt by quilting smaller portions and then putting them together. When you quilt as you go, you can divide it into as many parts as you like then sew them together later.
Some Final Words
No one needs to tell you why you need a blanket on a cold night. But there’s something heavenly about turning the air conditioning on full blast and being wholly wrapped under a cozy blanket.
I hope this post gave you more confidence to quilt! Happy sewing!

![Read more about the article How to Use Quilting Rulers [Guide]](https://www.sewkitkit.com/wp-content/uploads/2019/07/How-to-Use-Quilting-Rulers-1-300x168.jpg)
![Read more about the article How to Erase Chalk Markers in 3 Easy Steps [Guide]](https://www.sewkitkit.com/wp-content/uploads/2019/06/how-to-erase-chalk-markers-300x168.jpg)
